Printer Status LED’s
The Epic 430TM printer has four indicator lights to indicate various operating states of the printer. In general these are Fault, Cover Open, Paper Status, and Ready.
The printer may be in normal operation, self test or in one of two boot load modes. The Ready and Fault indicators will indicate which mode by a unique blink pattern:
TransAct Boot Load Mode
In TransAct Boot Load Mode, the power LED will blink slowly with a 50% duty cycle. It will repeat this cycle about every 2 seconds (1 Sec on, 1 Sec off). There will be a red indication on the Error LED indicator until the down load is started.
Self Test Mode
When the printer is in Self Test Mode, the power indicator will blink slowly with a 50% duty cycle at a 2 second rate. This is very similar to TransAct Boot Load Mode, however, the red error indicator will not be present.
Normal Operation
During Normal operation, the Power LED will remain on unless an error is being indicated. There are two classes of errors, soft errors and hard errors. Soft errors are recoverable without power cycling the printer; conversely, recovering from hard errors requires removing the power from the printer, correcting the problem, and then reapplying power.
| Status | LED response |
| Power On, Printer Ready | Power LED on (Not Blinking) |
| Paper Low | Paper LED Blinking |
Soft Errors
Soft errors may be recovered by the host, or by opening and closing the printer cover. Each of these errors is indicated by a 5 second repeating blink pattern on the Power LED with the red Error LED continuously on.
| Out of Paper | 2 blink | Paper LED will also be on |
| Cover Open [1] | 4 blinks | |
| Jam Detected | 5 blinks | |
| Missed Top of Form | 6 blinks | Paper LED will blink fast |
| Illegal or Bad Command | 7 blinks | Error LED will blink fast |
| Printer Over Temp | 8 blinks | Error LED will blink slow |
| Bad Power | 8 blinks | Error LED will blink fast |
Hard Errors
Hard errors have a similar blink pattern to soft errors, except that they are slower and repeat every 10 seconds. In general, these errors occur during level 0 diagnostics and are not recoverable. In these cases, the Error and Power LEDs will blink at the same time.
Auto Error Recovery
The Epic 430TM printer has the ability to auto recover from some internal errors.
Flash Format Errors
The internal flash that is used to store graphic images is formatted to assure data integrity. If this format is corrupted, the printer will automatically delete and reformat the flash. The host can then reload the images.
Input Power Fault
The printer monitors the power input to the printer. If it is found to be greater than 26 volts or less than 20, the printer will stop and wait for the power to return to specification.
Head Temperature Fault
The printer monitors the head temperature. If the head temperature is greater than 60º C, the printer will start to slow down. If the head exceeds 65º C, the printer will stop. The printer will heat the head to maintain a head temperature of 25º C. If the printer can not maintain a head temperature of 0º C, the printer will stop. In all cases, the printer will automatically recover when the head temperature is within range.
Configuration Faults Recovery
The printer maintains an operating configuration in EEPROM. Information such as the printer’s serial number, operating configuration, and running totals are stored in this memory. Each section of this memory maintains a check character to signal that the data is valid. If this memory is found to be corrupted, the printer will restore it based on a backup copy saved in flash. This flash copy is generated when the printer was electronically configured using the TransAct® configuration tool. Any configuration parameters altered during normal operation, will not be saved in the flash copy. The EEPROM will be restored to the value set by the configuration program
Cleaning the Print Head
Once the unit is opened, the paper path is accessible for cleaning or clearing paper. Use a soft brush to clean the paper dust from inside the printer. The paper dust should also be removed from the sensor optics. If streaking on the printed ticket is evident, the thermal print head may need to be cleaned. This can be with a cotton swab moistened with an alcohol solvent (ethanol, methanol, IPA).
Warning: After printing, the print head can be very hot. Be careful not to touch it and let it cool down before you clean it. Do not damage the print head by touching it with your fingers or any hard object.
Printer Sensors
The Epic 430TM printer uses several sensors to provide feedback to the host system, as pictured in Figure 1.
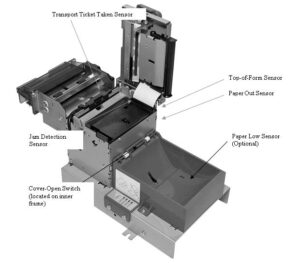
Figure 1. Sensor Breakdown and Locations.
Paper Out Sensor
A Paper Out Sensor, mounted to the Lower Paper Guide, optically senses a Paper Out flag located in the ticket path. When the sensor detects the flag, it indicates that the ticket roll is depleted.
Cover-Open Switched
A Cover-Open Switch, mounted to the inner right side plate, is activated when the Top Cover is closed and the latch depresses the switch arm. When the Top Cover is opened, the Cover Open switch trips, and the printer goes off-line.
Top-of-Form
A Top-of-Form Sensor is mounted in the Lower Paper Path, and senses a pre-printed black dot (if present) on the ticket stock. This black mark is used to position the paper for printing on a preprinted form. Typically the ticket is pre-positioned to the Top-of-Form and when the ticket is complete, the paper is fed to the Top-of-Form and then cut.
Paper Low Sensor (Option)
The Epic 430TM has an optional interruptive Paper Low Sensor. This sensor is mounted to the Paper Bucket and will provide an indication that the paper is getting low. The length of paper remaining when paper low is sensed is dependent on the paper roll core diameter.
Jam Detection Sensor
A jam sensor is mounted to the knife frame, and senses the presence of a ticket immediately before and after a knife cut. Under normal conditions, the ticket should be present at the detector before a knife cut, and not present after the cut and delivery of the ticket. If a ticket is not processed properly the jam detection sensor detects the improper ticket progress, stops the printer and enters a jammed state. The jam must be manually cleared before additional tickets can be printed.
Transport Ticket Taken Sensor
A Ticket Taken Sensor, mounted in the Ticket Transport, is used to detect the lead edge of the ticket as well as determine when customers have actually taken the printed ticket
Clearing Paper Jams
In the unlikely event of a paper jam, it is important to completely clear the jam before restarting the printer. In general it is not required to power cycle the printer to clear a paper jam, however, there are cases where the printer must be power cycled to properly home the cutter blade. (See below)
1. Expose the paper path by pressing the cover open button.
2. Make sure the paper path is clear and there are no obstructions through the knife or transport.
3. Clear Printer jams by removing any paper from within the printer.
a. CAUTION: If the paper is wrapped around the platen, the printer power MUST be turned off to allow the paper to be removed. Failure to turn the power off will result in the paper getting stuck behind the platen and being more difficult to clear.
b. If the paper is jammed in the knife, carefully remove the paper from the knife assembly. If the knife cutter is in the paper path, turn the power off, close the cover, and turn the power back on to allow the printer to re-home the cutter blade.
4. Clear Transport jams by carefully removing any obstructions.
a. CAUTION. Do not force objects into the transport from the front. This can damage the ticket taken sensor. Due to variations in bezel designs; it may be difficult to clear a jam between the transport and the bezel. If the jam is not accessible, it may be required to remove the bezel to properly clear the jam.
5. Prepare the end of the paper with a clean square cut end with no folds or distortions to the paper.
6. Thread the free end of the paper through the knife assembly opening as shown. If the paper will not freely go through the knife, the knife is still jammed. Go back to step 3.
7. Push the end of the paper towards the transport rollers. Place the end of the paper as close to the transport rollers as possible. Make sure the paper is aligned with the paper guides and not skewed.
8. Close the cover by rotating it back into position until it securely clicks into place. Paper will feed automatically, and then print and eject a test ticket.
9. If the paper path was not completely cleared the printer will re-enter the jam state. Do not simply open and close the cover to clear a jam. The paper path including the transport and bezel must be clear before proper operation can be restored.
Loading Paper
The Epic 430 printer uses a continuous roll of POS or Lottery grade thermal paper, with specifications outlined in the manual.
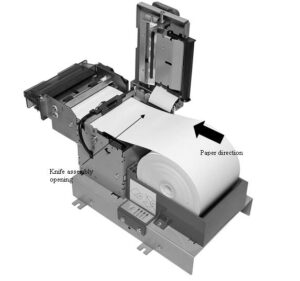
Figure 2. Loading a Paper Roll.
Instructions for loading the paper are as follows:
- Open the top cover of the printer by pressing the cover open button.
- Make sure the paper path is clear and there are no obstructions through the knife or transport.
- Place a roll of new paper in the paper holder, with the end of the paper unloading from the back to the front of the printer, as shown in the figure
- Prepare the end of the paper with a clean square cut end with no folds or distortions to the paper
- Thread the free end of the paper through the knife assembly opening as shown.
- Push the end of the paper towards the transport rollers. Place the end of the paper as close to the transport rollers as possible.
- Make sure the paper is aligned with the paper guides and not skewed.
- Close the cover by rotating it back into position until it securely clicks into place. Paper will feed automatically, and then print and eject a test ticket.