Your AccuDate terminal is configurable in a number of ways that can be accessed from the Settings Screen. To access the Settings Screen, press the Setup button (Gear Icon in the bottom row of buttons). You will be prompted for your password. If you cannot remember your password, then refer to the following article: (What Is My Password? Link)
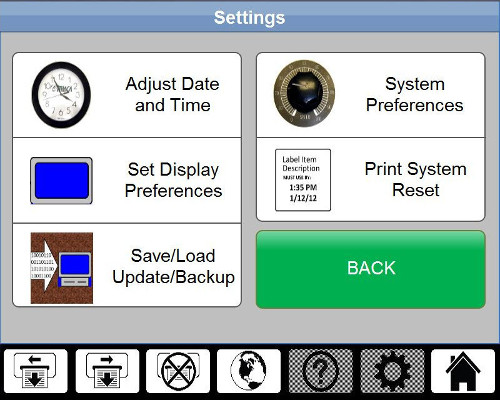
From there, you will have 4 options universal to both the AccuDate PRO and the AccuDate 9700, and 1 option specific to either the PRO or 9700.
- Adjust Date and Time
- Set Display Preferences
- Save/Load/Update/Backup
- System Preferences
- PRO: Print System Reset
- 9700: Configure Print Button
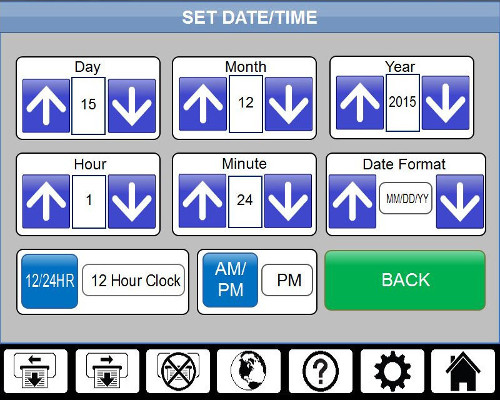
Adjust Date and Time
A rather self-explanatory page, Adjust Date and Time will allow you to adjust the day, month, year, hour, minute, date format, 12 hour vs. 24 hour format, and AM/PM settings on your terminal.
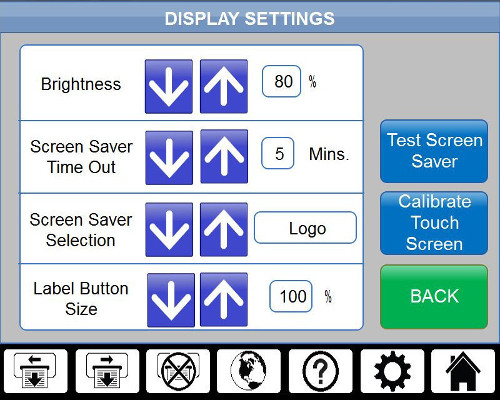
Set Display Preferences
From this page, you can adjust the brightness of the screen, how long it takes for the screen saver to start, what the screen saver looks like, and how large the label buttons on your home screen are (100% = 4 x 5 buttons, 125% = 3 x 4). You also have the option to test your screen saver, and to calibrate your touchscreen. However, if your screen needs calibration and this page cannot be reached, there is another way, detailed here: My Screen Is Frozen: How To Calibrate Touch Screen (9700); My Screen Is Frozen: How To Calibrate Touch Screen (PRO)
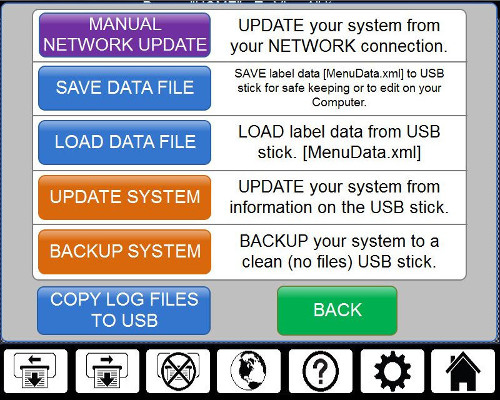
Save/Load/Update/Backup
This page is detailed further in other articles (How To Update Via USB: How To Update Via USB (PRO), How To Update Via USB (9700); (Link to How to Update Via Network, PRO)). The options are as follows:
- (PRO Only) Manual Network Update: Update your system from a Network connection. MenuData, Label Layouts, and Batch files specifcally can be updated, or an Update Patch containing further data can be selected, if your company has instructed a certain patch be downloaded. A similar option is available in the 9700’s System Preferences page.
- Save Data File: Save only your MenuData.xml file to a USB Flash Drive.
- Load Data File: Load only a MenuData.xml file from a USB Flash Drive to your terminal.
- Update System: Update the system files on your terminal with whatever corresponding system files are found on your USB Flash Drive.
- Backup System: Backup your system files to a clean (no files) USB Flash Drive
- Copy Log Files To USB: You may be asked to do this during troubleshooting, so that a better idea of what your terminal is doing can be gotten.
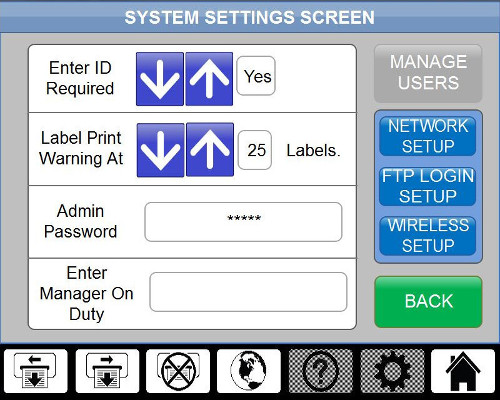
System Preferences
On this page, you can adjust the following:
- Whether an ID or user initials need to be entered before printing labels
- What number of labels in a single print job will prompt with a warning
- Your admin password
- The name of the manager on duty
- How your network connection is configured (Network Setup on PRO, Network on 9700)
- (PRO Only) FTP Login information
- (PRO Only) Wireless network configuration
- (9700 Only) Update your system through network TFTP (MenuData, Label Layouts, and Batch files, or a full Update Patch)
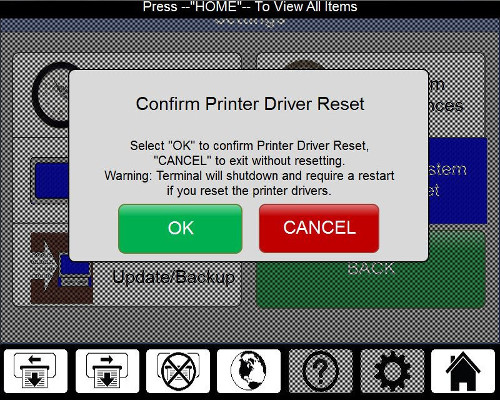
Print System Reset (PRO Only)
This option will reboot the whole terminal and restart the PRO’s printer driver. This may resolve some printing issues.
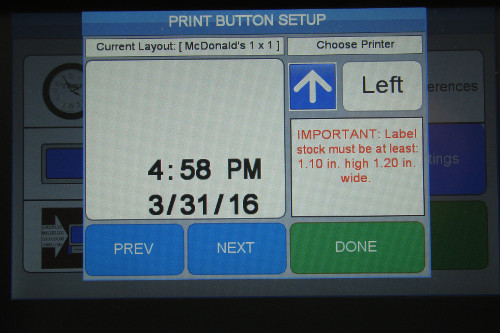
Configure Print Button (9700 Only)
This button will bring you to the Print Button Setup menu. You may have individual buttons for Left Print Button and Right Print Button. Use the Prev and Next buttons to select a different label format for that printer side. The Label preview will show you what information is displayed on each label, and there will be a warning for the minimum label size for that format. If you only have one Configure Print Button option, then you can also change which printer mechanism is selected. Left is the default, in such a case.